Tuesday, June 28, 2011

River Rock/Slate Shower

This is a slate shower where one wall is tiled with river rocks coming out into the main bathroom. Slate is always an amazing challenge because it varies in shape, size and color. I like to seal all the slate once before installing. This makes it easier to remove thinset or grout that touches the surface. It also protects against water stains that may occur while using a wet-saw or grouting. Slate is very soft and porous and soap scum can easily be absorbed into the tile. I recommend using a penetrating sealer before installation and a sealer that stays on the surface after grouting. I did a total of three sealer coats on this job. Slate is a great natural stone that comes in so many colors and textures. Sometime you can find fossils in it too.
This is the view when you first walk into the shower.
It was kind of hard capturing this room with my camera. This is the wall that will have the sink & mirror on the outside of the shower. The insert boxes are opposite of this wall. The faucet and shower head are opposite of the rock wall.
Here I got to blend the rock wall into the base tile that frames the main bathroom floor.

Bathroom w/ Porcelain Floor Tile

This is a simple diamond or 45 degree pattern based off the position of the shower. I started at the front door of the shower and centered the grout joint with the center of the door. I used a 1/8 inch grout joint throughout. The tile is made of porcelain with a high gloss finish. Simple but came out really dramatic.
The first picture is grouted and caulked around the tub. The next couple of pics are before I grouted.

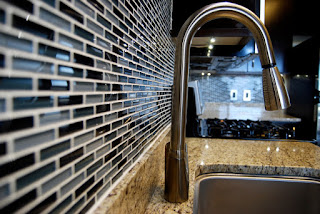
Glass Mosaic Kitchen Backsplash

Below is a super clean and dramatic glass backsplash. Looks really striking against the dark cabinets. I had a lot of fun doing this one.


Photos by Amado Avecilla

Sunday, March 20, 2011

Custom Shower w/ Natural Rock Floor

This was a great job for many reasons. Since the "client" is a good friend, I (we) got to get really creative with the design. This is actually a complete renovation. New toilet, vanity, light, mirror and of course tile!
I did this feature band and feature "diamond" with 3/4 inch glass & travertine squares and framed it with travertine pencils the stick out to create sort-of ledge. Adds a lot of dimension to the overall design.
Here you can catch a glimpse of my custom soap dish. I make these out of field tile and face it off with a bullnose. If you've ever had problems finding one of those pre-made soap dishes because they never quite match the rest of your tile, you'll appreciate this technique.
Custom insert box or niche. This whole job started here. I wanted to get this lined up perfect. This took a lot of planning because you have to frame these boxes out with 2x4s in between the studs, then cover the framing with cement board, then water proof that and hope your measurements were accurate. If not, it takes a lot to take all that apart to re-frame it. I got lucky here. Or maybe I'm just good!

Custom Shower with natural rock floor 2

Below are more pics from the previous post.
This is a close up of the natural rock floor on the shower. There is a very slight slope for drainage. Looks and feels like your are walking in a shallow rocky creek in the woods. Great grout color to simulate sand.
Here is a shot of the main bathroom floor. I decided to do a diamond pattern to contrast the rectangles on the walls. Took more time, but was well worth it.
Hard to capture everything in these tight rooms. I tried to show the layout from inside the shower.
This a tile foyer that I installed months before the shower. It is actually the same tile that is in the shower, just different sizes and colors.
Wasn't sure how to address the diamond pattern with the closet, so I decided to just do the "brick" pattern in the closet to allow the diamond pattern to appear to be framed by a single darker tile. When the door is closed, it just looks like a dark brown frame. When you look inside, you see a charming brick layout.